
Before anything else: thank you for becoming a part of Lapera. You made this happen.
This is the quick start guide to installation and use of your new lever machine (version 1.3.00 for DS3 (3rd Edition)). Please read it at least once before you start playing :)

- Please note that this device, like sharp knives and hot stoves, can be dangerous if misused. Do not let anyone unfamiliar with its operation use it without prior instruction.
- The spring in the lever group is very powerful, using the lever incorrectly could lead to serious injury. ALWAYS keep your body and face out of the path of the lever’s travel. If you wish to use the lever without the portafilter or with no coffee in the portafilter (i.e. to flush water through the group) you must make sure to keep a firm grip on the lever handle at all times during operation. USE BOTH HANDS!
- The surfaces of the group and the steam and water taps are hot – make sure not to touch them once the machine reaches operating temperature.
- The steam and hot water taps deliver super-heated steam and boiling water. The group delivers water just below boiling point. All three of these are hot enough to scald. Be careful.
Installation:
- Plumbing
- Water inlet – The water inlet is 3/8 G thread (also known as 3/8 BSPP) and is under the drip tray on the left side (all descriptions are from the barista’s point of view). 1/4″ or 3/8″ John Guest push-fit adapters for use with potable water polyethylene tubing can be fitted on request. The water line to the machine must have its own dedicated shut-off valve. In addition to being a good idea, this is also happens to be plumbing code. You knew this of course.
- Minimum pressure – The minimum water supply pressure required for the machine is 1.6bar (23psi). The machine will not function correctly unless there is a minimum of 1.6bar (23psi) water supply pressure and operating it with a supply below this pressure can be dangerous. Municipal water supplies are typically between 2.7 and 5.4bar (40-80psi) but if you are installing the machine in a location where the water pressure is supplied by a pump (a cottage or house in a rural area or in a coffee cart for example) make sure that the pressure is adequate even when other fixtures (sinks, dishwashers, showers etc) are in use.
- Recommended water pressure – The recommended water pressure is 2.2bar (32psi) which can be obtained by adding a water pressure regulator in line with the supply. Jeff Bezos sells these if you don’t have a reputable supplier for this kind of thing.
- Water quality – Water chemistry is a complicated subject and a full discussion of it is beyond the scope of this document. Minimally, if your municipal water supply contains more than 100 mg/l hardness it is probably advisable to filter it – not doing so may have adverse effects on your coffee equipment. If you want to take a deep dive then I suggest reading Jim Schulman’s Insanely Long Water FAQ. To paraphrase Mr. Schulman:
- Municipalities (are supposed to) publish analyses of their drinking water from which you can find the hardness and alkalinity.
- It is generally agreed that the ideal water for coffee is 100 mg/l hardness and 50mg/l alkalinity.
- These levels are optimal for preventing corrosion, but will result in deposition of some limescale.
- A little bit of limescale buildup is good (to prevent corrosion), but a lot of scale buildup is (obviously) bad.
- Using water with dissolved salts or ion or sodium-exchange water softeners is to be avoided as halides (salts) are corrosive to stainless steel.
- Flow rate – Flow rates have an impact on pre-infusion and boiler fill rate. At the recommended supply pressure of 2.2bar (32psi), the flow rate from the group (with no portafilter installed) should be around 23 ml/s (+/- 5ml/s). Longer pre-infusion times (which may or may not be desirable) can be achieved by adding a flow reducing valve or by lowering the supply pressure (but not below the minimum 1.6bar (23psi)).
- Drain – The sump under the drip tray requires a connection to a drain (you knew this also). A flexible hose with an approximately 17mm (5/8″) interior diameter, a 5/8″ elbow or two and some hose clamps (none of which are in the box, sorry, but are available on request) are ideal for this purpose. DO NOT open the drain valve when the machine is hot – doing so is dangerous and may damage the valve seals.
- Electricity
- GFCI – Electrical code in North America mandates the use of GFCI (Ground Fault Circuit Interrupter) receptacles in areas where appliances are used in close proximity to water. European code mandates the use of circuit breaker GFCIs in the electrical panel. Wherever you are, this would definitely qualify as an “appliance in close proximity to water” and you should definitely use a GFCI. Even good coffee isn’t worth the risk of not doing so. Please consult a qualified electrician if you are unsure.
- Electrical cable – The machine is supplied with either an 18AWG (1.0mm2) for operation on single phase 220-240V or a 14AWG (2.5 mm2) cable for use on single phase 120V respectively. Use only the cable that was shipped with the machine or a cable with the same or a larger cross section / wire gauge if you are replacing it. The receptacle for the plug is underneath the machine at the back right hand corner. Locate the cable and the receptacle and plug it in. Don’t turn it on yet though. Note that the 220V machine is NOT designed to run on two-phase 220-240V that is standard in North America and it is dangerous to do so.
- Under the hood – Presumably this goes without saying, but I’ll say it anyway: the cup warmer is like the hood of a car, once it is removed there are lots of hot things and potentially dangerous bits exposed if you really go looking for them. After you plug in the machine, don’t touch anything inside.
- GFCI – Electrical code in North America mandates the use of GFCI (Ground Fault Circuit Interrupter) receptacles in areas where appliances are used in close proximity to water. European code mandates the use of circuit breaker GFCIs in the electrical panel. Wherever you are, this would definitely qualify as an “appliance in close proximity to water” and you should definitely use a GFCI. Even good coffee isn’t worth the risk of not doing so. Please consult a qualified electrician if you are unsure.
- I know that you have already opened the box and screwed the lever handle in place before reading any of this, but if you didn’t, now would be a good time to do so. Close both the steam and hot water valves (if they are open) by turning them to clockwise. Also turn off the boiler drain valve connected to the sump under the drip tray – if it is open. The valve is off when the handle is pointing down. You might now wish to put the drip tray and portafilter in place.
- For the cup-warmer (the top panel), a little pressure outwards on the side rails as you are installing it will prevent it making contact with the wood and marking the finish. Insert the back edge of the panel first as it is narrower than the front, and then lower the front down into place pushing the side rails gently outwards.
- You are done. Whew. Beer?
First Time Startup:
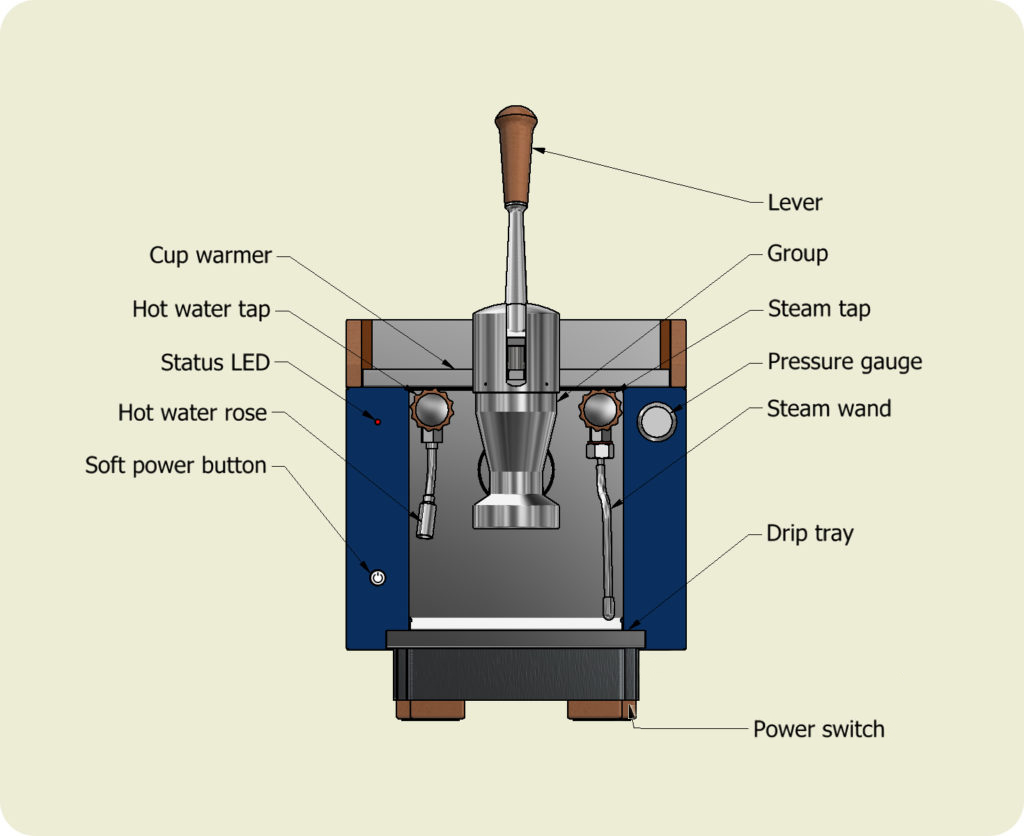
1. Locate the switches – there are two: a “soft” power button on the left front panel and a “hard” power rocker switch underneath the machine on the right side at the back.
2. Locate the three-button touch control interface below the screen on the controller under the drip tray.
3. Turn on the main “hard” power switch underneath the machine. The controller will boot and show the Lapera logo, followed by the firmware version and then the current day, time, temperature, boiler set point and mode on the screen. The screen saver will shut off the display after a short period of inactivity. If the screen goes blank, press any key to wake the display.
4. Press the right hand button twice to enter the menu mode and navigate through the menus until you reach “Autofill Timeout”. The Autofill Timeout is the maximum length of time that the valve that controls the flow of water to the boiler will stay open before the machine goes into error mode and shuts down. Ninety seconds should be long enough to completely fill the boiler from empty if the flow rate of the water supply is adequate. However, certain filtration or water conditioning systems may reduce the flow rate. Press the center button once (briefly) to edit the setting (the value will start to flash to indicate that it is ready to edit). Press the left button twice (or the right button a whole bunch of times) until the setting reads “90 secs” (i.e. ninety seconds). Press the center button once again to confirm the change. The value will stop flashing to indicate that it has been confirmed.
5. Press the “soft” power button on the front of the machine – it will latch in position. You should hear the solenoid open and the water begin to fill the boiler. It should run continuously for about a minute and then click on and off a few times as the water level settles in the boiler. If the flow rate is too slow and it takes more than ninety seconds, the machine will go into error mode (indicated on the controller screen and by a series of 3 blinks on the LED status light on the front panel. If this happens, soft power-cycle the machine (i.e. press the button on the front panel to turn it off, wait a couple of seconds, and then turn the machine back on). The fill cycle will begin again and should complete successfully.
6. If at this point there is water on the floor or the machine keeps going into error mode, throw it away and order a new one. Otherwise, it should now be heating up and the front panel status light will start glowing from off to full.
7. Edit the Autofill Timeout value again to return it to a low value. 15 seconds is recommended, but you can make it longer if required.
8. Keep an eye on it for a half hour or so while it builds its first head of steam – it has had a long journey after all. You can monitor the boiler temperature with the controller interface – just navigate forward through the menus till you reach the “Exit” option and then press the middle button once – this will return you to the operating display which shows the current boiler temperature.
9. A note about the boiler set point. The boiler temperature determines the temperature of the both the group and the brew water that reaches the puck. The set point for your machine has been calibrated using precision instruments on our test bench. We feel that this set point is a good place to start for medium roasts. For lighter roasts you may wish to increase the boiler temperature by three or four degrees.
10. In about an hour, once the cover of the group is hot to the touch, you are ready to make your first coffee :)
Or just get in touch and I’ll talk you through it…
At some point, you may also wish to read the Maintenance Guide and the Controller Software Guide.